What is Dependency Injection?
Dependency Injection is a design pattern where an object receives (or injects) other objects that it depends on.
Let’s look at it with an example of a class named “House”
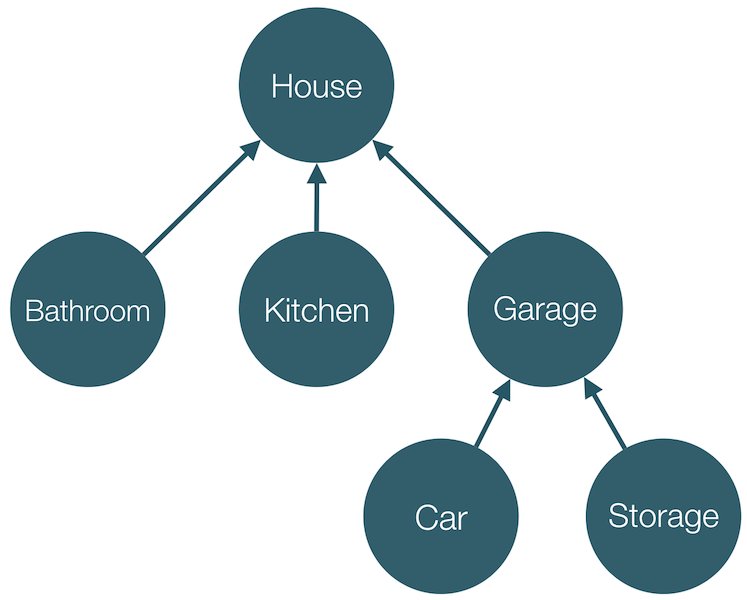
As per this tree, House has 3 dependencies, namely Bathroom, Kitchen and Garage and similarly Garage has 2 dependencies, namely Car and Storage.
Now if I want to create an instance of House, I will have to initialise those dependencies first. Something like this:
val bathroom: Bathroom = Bathroom()
val kitchen: Kitchen = Kitchen()
val car: Car = Car()
var storage: Storage = Storage()
var garage: Garage = Garage(car, storage)
val house: House = House(bathroom, kitchen, garage)
What I did here is called Manual Dependency Injection.
All this boilerplate code of initialising the dependencies(objects) manually, just to create one object can be reduced in Android by using Hilt.
By using Hilt, we just tell the compiler once how to create an instance of a class and then just inject(or pass it) it anywhere.
Hilt is a dependency injection library for Android that reduces the boilerplate of doing manual dependency injection in your project.
Setup
Setting up Hilt in your project requires just 3 simple steps
1. Add dependency in your app’s build.gradle
implementation("com.google.dagger:hilt-android:$hilt_version")
kapt("com.google.dagger:hilt-android-compiler:$hilt_version")
2. Add plugin in your app’s build.gradle
plugins {
  kotlin("kapt")
  id("com.google.dagger.hilt.android")
}
3. Add classpath in your project’s build.gradle
classpath "com.google.dagger:hilt-android-gradle-plugin:{latest-version}"That’s it. We are now ready to start implementing Hilt in our project.
Implementation
Let’s start implementing Hilt in our application now.
Hilt Application Class
First step of implementing Hilt in an Android Project is annotating your Application class with @HiltAndroidApp
@HiltAndroidApp
class ExampleApplication : Application() { ... }
What does this annotation do?
It triggers Hilt’s code generation, including a base class for your application that serves as the application-level dependency container. In simpler words, this makes our Application class as the root node of our tree (just like the House node in the above example)
Inject dependencies into Android classes
In order to inject dependencies in any Android class, we need a Hilt component for that just like our Application class. To generate that we have to annotate our Android classes with @AndroidEntryPoint.
Hilt supports following Android classes:
- Application (by using @HiltAndroidApp)
- ViewModel (by using @HiltViewModel)
- Activity : Hilt supports only those activities that extend ComponentActivity, such as AppCompatActivity
- Fragment : Hilt supports fragments that extend androidx.fragment. Also, Hilt doesn’t support retained fragments.
- View
- Service
- Broadcast Receiver
Note: If we annotate an Android class with @AndrodEntryPoint, then we also must annotate Android classes that depend on it. For example, if we annotate a fragment, then we must also annotate any activities where we use that fragment.
Types of Dependency Injection
There are two ways of injecting any object into a class namely Constructor Injection and Field Injection.
Let’s say we have a ViewModel which depends on a Repository. So I want to inject this Repository into my ViewModel. Let’s see how we can do that with both types of injection.
Note: If we want Hilt to inject any object(or dependency) in our class, we have to annotate that field with the annotation @Inject.
1. Constructor Injection
@HiltViewModel
class BlogViewModel @Inject constructor(val blogRepository: BlogRepository) : ViewModel() {

// my view model code

}

class CommunityRepository @Inject constructor(){

// my repository code

}
2. Field Injection
@HiltViewModel
class BlogViewModel : ViewModel() {

@Inject
lateinit var blogRepository: BlogRepository

// my view model code

}

class CommunityRepository @Inject constructor(){

// my repository code

}
Both of these do the same thing. So which one should we prefer? Actually it’s a controversial topic. I will share what are my learnings on it and then you can decide which to choose as per your requirement.
- If we want to know which are the dependencies of a class, it will be easier if we use Constructor Injection.
- We can create our dependencies as “val” if we use Constructor Injection whereas it’s mandatory for us to create field injected fields as “lateinit var” and as per Kotlin standards we should try having immutable fields wherever possible.
- If our class depends on, let’s say 6 other objects, so it will have 6 parameters in it’s constructor which is not recommended for a good coding style.
So in short none of them has any big advantage over the other. You can use them as per your comfortability.
Note: Fields injected by Hilt cannot be private. Attempting to inject a private field with Hilt results in a compilation error.
That’s it for this article. Hope it was helpful! If you like it, please hit like.
In the next article, I will focus on how to inject classes we do not own or which can’t be instantiated with a simple constructor.
Checkout the other articles of the Dependency Injection series:

2 responses to “Basics of Dependency Injection in Android using Hilt (Hilt Part 1)”
I love the simplified and easy to read article thanks anticipating for more great tutorials as such thanks.
LikeLiked by 1 person
Thank you so much for your wonderful feedback! I’m thrilled that you found the article simplified and easy to understand. Your support means a lot to me. 😊 I’m excited to let you know that I’ve just launched another article in the same series. You can explore all the articles in the Dependency injection series at this link: https://tanyatechzone.com/category/dependency-injection/. I hope you’ll enjoy the new content as well. Stay tuned for more great tutorials and feel free to reach out if you have any questions or suggestions. Happy learning! 🚀📚
LikeLike