
Git workflows are sets of practices and procedures that dictate how a team collaborates on Git-based project. These workflows define rules, guidelines and steps for version control, branching, merging and code deployment. Git workflows encourage developers and DevOps team to leverage Git effectively and consistently.
When working with a team on a Git-managed project, it’s important to make sure that the team is all in agreement on how the flow of changes will be applied. To ensure the team is on the same page, an agreed-upon Git workflow should be developed or selected.
There are several well-publicized workflows available. I’ll provide a concise overview of these workflows and then delve into how I blend and customize them to identify the most fitting workflow which scales with team size.
- Centralized Workflow
- Great for teams transitioning from SVN
- Single master branch where all developers commit their changes directly
- Simple and suitable for small teams or projects
- Lacks isolation and may lead to conflicts if multiple developers are working on the same code simultaneously.
- Feature Workflow
- Each new feature or task gets it’s own branch off the main branch
- Developers work on their feature branches and merge them back into the main branch upon completion
- Facilitates isolation, code review, and easier collaboration among team members
- Gitflow workflow
- Extends the feature branch workflow by introducing specific branches for development (develop), release (release), and long-term maintenance (master)
- Incorporates a stricter branching model for managing feature development, releases and hot-fixes
- Suitable for larger projects with frequent releases or complex versioning needs
- Forking Workflow
- Each developer forks the main repository into their own remote repository
- Changes are made in feature branches within the forked repository, and then pull requests are created to merge those changes back to the main repository
- Commonly used in open-source projects to manage contributions from external developers
Now let’s start with discussing the workflow that I think fits best for most teams and is scalable.
Note: I’ll be using Github for explaining the same.
Step 1: Checking out the code on local system
When we start working on a project, the first step we need to do is to get the code on our local system. To do the same, we will be following a few steps:
Fork the official repository
We can create a forked repository by clicking on the “Create Fork” button.
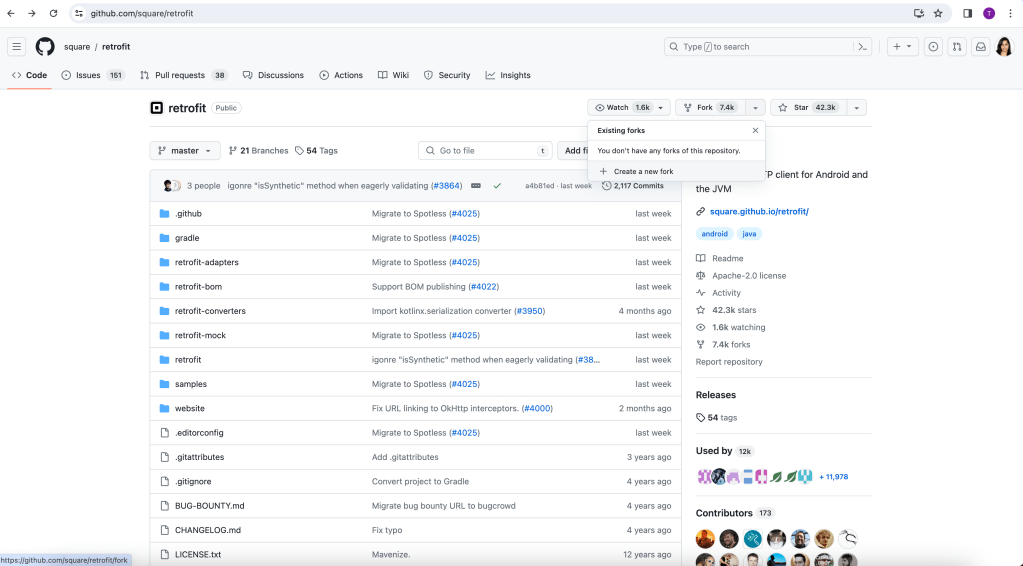

Forked repositories are created using the standard git clone command. They are personal “server-side cloned” repositories and usually managed and hosted by a 3rd party Git service like Bitbucket or Github.
The main advantage of the Forking workflow is that contributions can be integrated without the need for everybody to push to a single central repository. Developers push to their own server-side repositories, and only the project maintainer can push to the official repository. This allows the maintainer to accept commits from any developer without giving them write access to the official codebase.
Clone the repository
Now instead of cloning the official repository, we will be cloning the forked repository.
git clone {{forked repo url}}
git clone https://github.com/TanyaArora/retrofit.git
Step 2: Adding a remote
Now we have the latest code on our system. But the code in the official repository will get updated every now and then. How will we get the updated code on our system?
We will add the upstream remote using the following command
git remote add upstream {{url}}
git remote add upstream https://github.com/square/retrofit.git
This will help us keep our local repository up-to-date as the official project progresses.
While other Git workflows use a single origin remote that points to the central repository, the Forking workflow requires two remotes-one for the official repository, and one for the developer’s personal server-side repository. While you can call these remotes anything you want, a common convention is to use origin as the remote for your forked repository(this will be created automatically when you run git clone) and upstream for the official repository.
Similarly, we can add the remote of any other user as well who has forked the official repository but in most cases, this is not required.
Step 3: Working in a branch
Our official repository will have only these 5 kinds of branches:
- master – contains code that is already pushed to production
- develop – contains code that is ready for QA
- release – contains code that is ready for deployment
- hotfix – created when a production bug needs to be fixed immediately
- feature – contains code for particular feature
We will see the how and when to use each of them with the help of multiple scenarios:
a big feature needs to be developed
- Create a feature branch on upstream from upstream’s develop branch on Github
- Fetch upstream code on your local system
- Create a new branch on your local system from this feature branch
- Do your changes, commit your code and push it to your fork
- Create a PR from your fork’s branch to upstream’s feature branch and get it merged
- Once the feature development get’s completed, raise a PR from upstream’s feature branch to upstream’s develop branch
Single developer is working ON a small project requirement
- Fetch upstream code on your local system
- Create a new branch on your system from upstream’s develop branch
- Do your changes, commit your code and push it to your fork
- Create a PR from your fork’s branch to upstream’s develop branch
git fetch upstream
git checkout -b my_branch upstream/develop
git push origin my_branch
Multiple developers are working Simultaneously
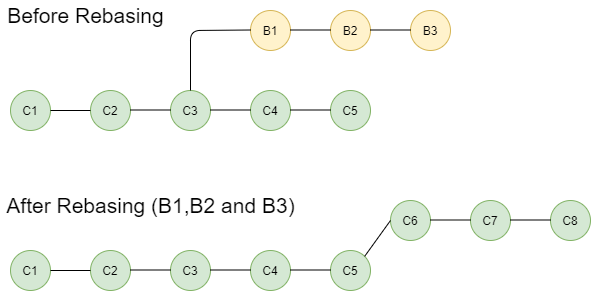
Let’s say there are 2 developers working on their separate tasks in a sprint. Both of them started their tasks at the same time by checking out a branch from upstream’s develop branch (commit C3).
Now, first developer’s PR got merged into the upstream’s develop branch (making develop’s new base as commit C5).
After a while, the second developer also wants to raise her PR to the upstream’s develop branch but she might get a merge conflict while raising the same. Why did this happen??
This is because the branches have diverged, meaning, she created a branch from commit C3 which is no longer the base commit. C5 is the base commit now. In order to have a clear linear commit history, what we want is that B1, B2, B3 are added on top of C5. This is achieved using the rebase command.
git checkout my_branch
git fetch upstream
git rebase upstream/develop

// If any conflicts come, resolve them and run following commands
git add .
git rebase --continue

git push origin my_branch

// If this gives an error that branches have diverged, then add -f to the above statement

git push origin my_branch -f
// -f here means force push, this is required because the base of local branch and the one on your repository have diverged
Sprint Completion
When all the tasks of a sprint are completed, that means, all PRs have been merged into develop, we follow the following steps:
- Create a new branch from upstream’s develop branch with the name release/v1.0.0
- Raise a PR from release/v1.0.0 branch to upstream’s master branch and get it merged
- Create a new tag on the master branch for this release
- Rebase and force push upstream’s develop branch from upstream’s master branch
production bug
Suppose, in between a sprint, we get a production issue from a past release which needs to go on immediate basis and we don’t want to send any of the tasks from the on-going sprint, so what do we do?
- Create a branch from upstream’s master branch with the name hotfix/v1.0.1
- Fetch upstream code on your local system
- Create a new branch on your local system from hotfix branch
- Do your changes, commit your code and push it to your fork
- Raise a PR from your fork’s branch to upstream’s hotfix/v1.0.1 branch and get it merged
- Raise a PR from upstream’s hotfix branch to upstream’s master branch and get it merged
- Create a tag for this hotfix release
- Official repository admin will now rebase the upstream’s develop branch from upstream’s master branch and force push the develop branch to make sure the current development is updated with the hotfix changes
Note: Adding the version name in release and hotfix branches name is important as it will help us while implementing CI process for creating tags.
Squash commits using interactive rebase
When we raise a PR, the reviewer might ask for some changes. We will do the changes, add a new commit and push our code.
Once the PR gets approved, we should squash our extra commits into our original commit, to avoid sending un-necessary commits on upstream.
git rebase -i HEAD~2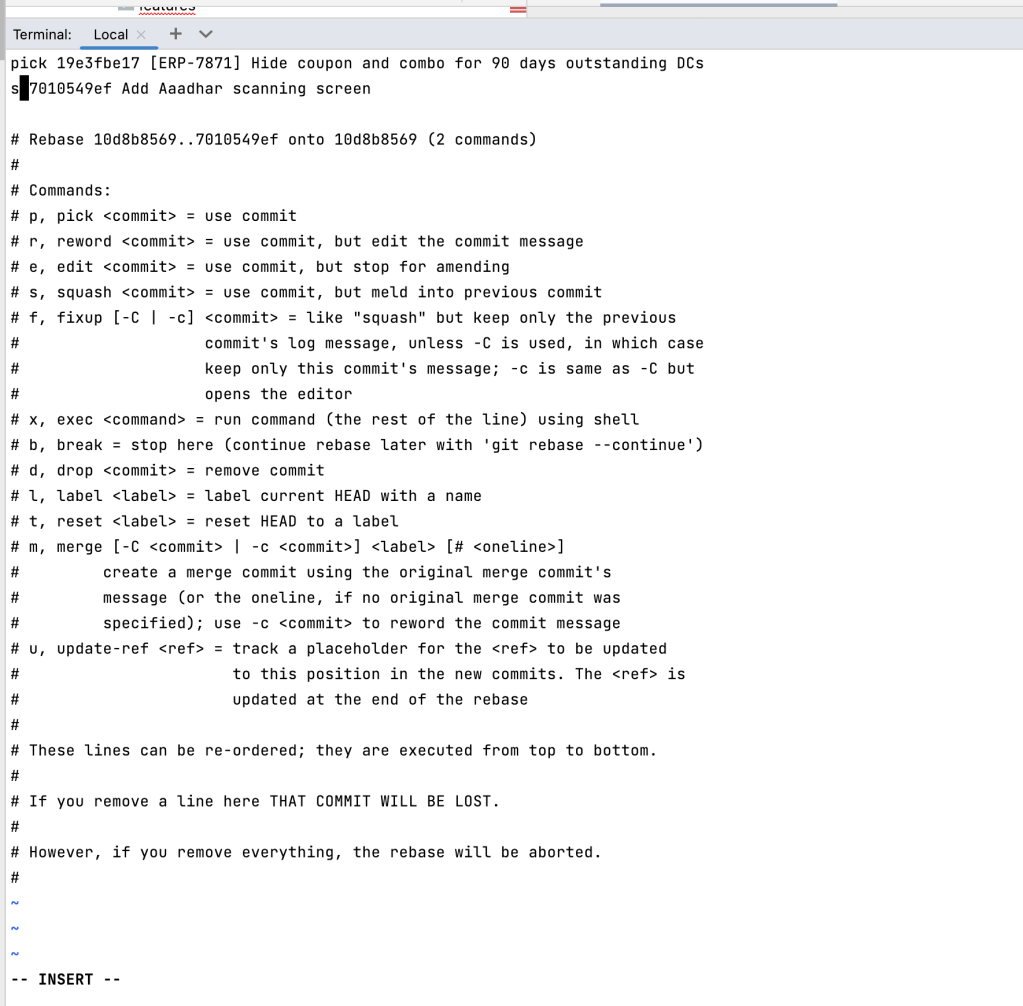
In the above screenshot, I’m using nano editor instead of the default vi editor. You can also change the same by running the following command:
git config --global core.editor "nano"Check out this link if want to know more about vi vs nano editor.
Note: Interactive rebase can also be used to drop/reword/edit any commit.
That’s it for this article. Hope it was helpful! If you like it, please hit like.

One response to “Git workflows”
hey
lovely blog hope all is well
happy blogging.
https://ketodietrecipes.co.uk/
LikeLike